New Era/Premier Xylophone Renovation
By: Margaret Swain - 2/7/2025
|
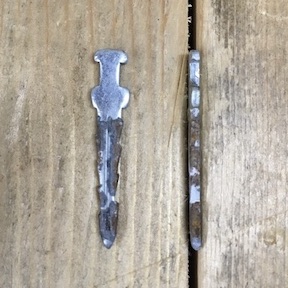
This set of instructions details a method for renovating xylophones and metallophones that were made in England using flat metal posts instead of nails as the basis to hold the tone bars in place. The posts look like this:
 These instruments were built using high quality rosewood for the tone bars, and were sold under various brands and labels. Some of the labels I have seen are New Era, Premier, RBI, and Selmer. There may be others. Because of the high quality rosewood, they are well worth repairing.
Since the production of these instruments stopped many years ago, no original parts are available. For glockenspiels labeled New Era or Premier, rubber post covers from another English brand Percussion Plus will work.
But the Percussion Plus rubber post covers for xylophones and metallophones do not fit every bar set from New Era/Premier etc. For many of these xylophones and metallophones, the Percussion Plus post covers are too wide to fit through the bars holes, and too wide to fit between the bars on the player's side.
Thus, I created Kit PNE-30 to be a universal repair kit for New Era, Premier and similar brands of xylophones and metallophones. These instruments were built using high quality rosewood for the tone bars, and were sold under various brands and labels. Some of the labels I have seen are New Era, Premier, RBI, and Selmer. There may be others. Because of the high quality rosewood, they are well worth repairing.
Since the production of these instruments stopped many years ago, no original parts are available. For glockenspiels labeled New Era or Premier, rubber post covers from another English brand Percussion Plus will work.
But the Percussion Plus rubber post covers for xylophones and metallophones do not fit every bar set from New Era/Premier etc. For many of these xylophones and metallophones, the Percussion Plus post covers are too wide to fit through the bars holes, and too wide to fit between the bars on the player's side.
Thus, I created Kit PNE-30 to be a universal repair kit for New Era, Premier and similar brands of xylophones and metallophones.
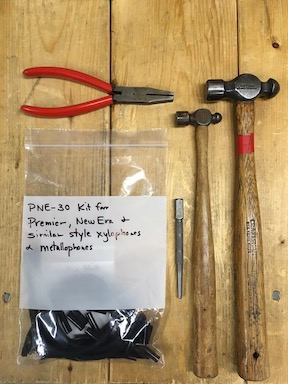 The kit is relatively easy to install. You will need: The kit is relatively easy to install. You will need:
- A small hammer (6 oz. or smaller ball pein is recommended)
- A nail set
- Long nose pliers for tubing installation
- Thicker, blunt-nosed pliers to align posts
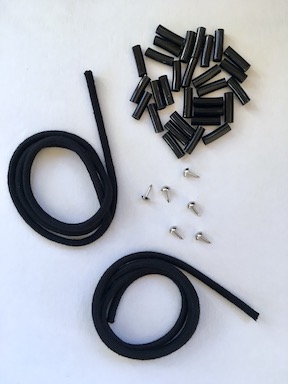
- Kit PNE-30
The larger hammer shown is a 6 oz. I found the smaller hammer very useful for working on soprano instruments where the clearance for attaching the tubing at the small end of the resonator box is quite limited.
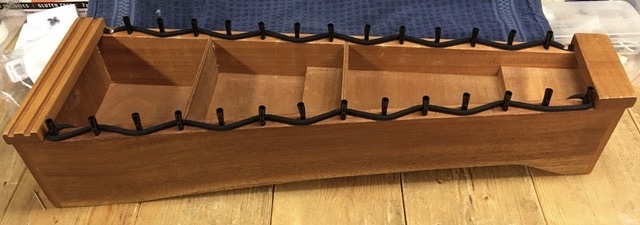
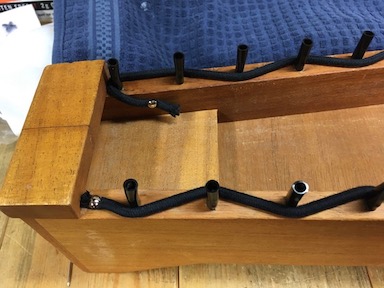
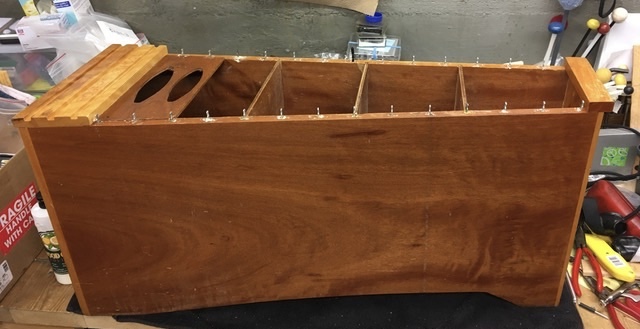
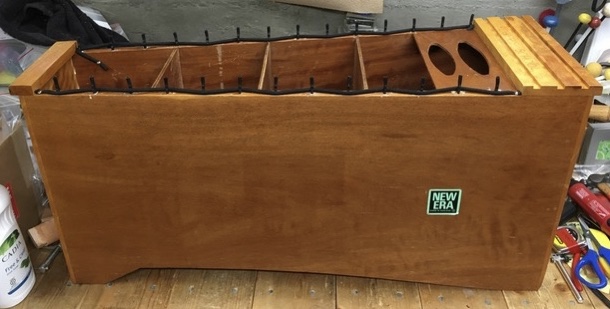
Using the PNE-30 kit, the repaired instrument will look like this. Note that the tubing under the bars is attached inside the resonator box on the side toward the player, while on the side opposite the player it is attached on top of the rail. All needed fasteners are included in kit PNE-30.
 1. Begin by removing worn rubber post covers from the entire instrument, or from only one side as needed. If only one side needs renovation, we do sell kit PNE-15 which contains half as many parts as kit PNE-30. If you still have at least 13 original post covers in good condition, you could move those to the side opposite the player, and use them to cover the posts that go through the bar holes. Then you would install kit PNE-15 on the side toward the player.
2. Check that all metal posts point directly up to the ceiling. If any are leaning to one side, align them with pliers. If any are loose, secure them with wood glue or wood putty before proceeding. 1. Begin by removing worn rubber post covers from the entire instrument, or from only one side as needed. If only one side needs renovation, we do sell kit PNE-15 which contains half as many parts as kit PNE-30. If you still have at least 13 original post covers in good condition, you could move those to the side opposite the player, and use them to cover the posts that go through the bar holes. Then you would install kit PNE-15 on the side toward the player.
2. Check that all metal posts point directly up to the ceiling. If any are leaning to one side, align them with pliers. If any are loose, secure them with wood glue or wood putty before proceeding.
 3. If any metal posts are missing, contact Mad Robin Music so we can provide you with replacements.
4. Once all metal posts are aligned and secure in their holes, and any glue or putty has set, push one rubber sleeve over each post. If you find it difficult to press the rubber sleeves over the posts, coat each post with a small layer of liquid dish soap. Do NOT use oil as a lubricant. Soap will dry and not be slippery by the next day.
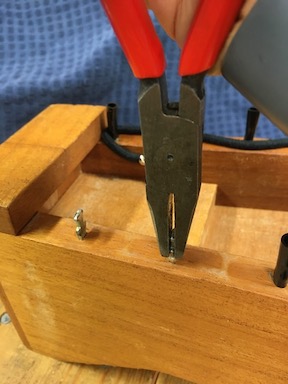
5. Attach the ALS1 tubing with the furniture nails provided. You are viewing the small end of a soprano xylophone in the photo below.
3. If any metal posts are missing, contact Mad Robin Music so we can provide you with replacements.
4. Once all metal posts are aligned and secure in their holes, and any glue or putty has set, push one rubber sleeve over each post. If you find it difficult to press the rubber sleeves over the posts, coat each post with a small layer of liquid dish soap. Do NOT use oil as a lubricant. Soap will dry and not be slippery by the next day.
5. Attach the ALS1 tubing with the furniture nails provided. You are viewing the small end of a soprano xylophone in the photo below.
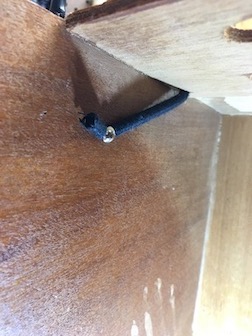
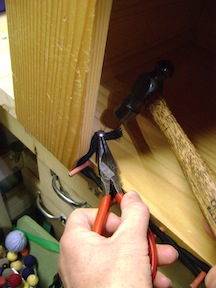 On the player's side where there are 14 posts, the furniture nails will attach inside the resonator box as shown. Tip the instrument on its side so the side surface is fully supported underneath, and attach using the technique shown in the photo below. This photo, which shows the large end of the instrument, is from a different repair, but the technique is the same. Puncture the tubing with the furniture nail, hold the nail shaft with long nose pliers, and install with your small hammer. If clearance is very restricted, turn the hammer on its side and install with the flat side of the hammer head. On the player's side where there are 14 posts, the furniture nails will attach inside the resonator box as shown. Tip the instrument on its side so the side surface is fully supported underneath, and attach using the technique shown in the photo below. This photo, which shows the large end of the instrument, is from a different repair, but the technique is the same. Puncture the tubing with the furniture nail, hold the nail shaft with long nose pliers, and install with your small hammer. If clearance is very restricted, turn the hammer on its side and install with the flat side of the hammer head.
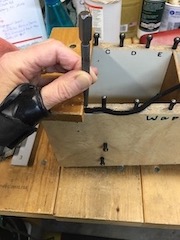 6. On the side opposite the player where there are only 13 posts, there should be enough room to attach the tubing at the end of each rail. This is where you will use the nail set to gain access to the furniture nail head which is in a recessed location at each end of the rail. See photo. Place the small end of the nail set on the head of the nail and strike the large end with your hammer. This photo is from a different repair, but the technique is the same.
7. If you have a bass xylophone with a baffle at the low end, the situation is a little different. 6. On the side opposite the player where there are only 13 posts, there should be enough room to attach the tubing at the end of each rail. This is where you will use the nail set to gain access to the furniture nail head which is in a recessed location at each end of the rail. See photo. Place the small end of the nail set on the head of the nail and strike the large end with your hammer. This photo is from a different repair, but the technique is the same.
7. If you have a bass xylophone with a baffle at the low end, the situation is a little different.
 On the player's side you may need to drill a hole in the baffle large enough to pass the tubing through the hole, and then attach it inside as shown in the photos below.

  8. On the side opposite the player, you will NOT need to drill a hole. There will be adequate space to install the furniture nail on top of the rail using the nail set to help you.
 Please contact Mad Robin Music if you have any questions about New Era, Premier and similar style repairs.
|
 |
| Back to Category List |
|
 Margaret Swain
I enjoy working to connect teachers to quality books and instruments for music and dance education. I hope you find my blog useful and interesting.
|
|
|
|
|
Orff Instrument Repair and Assembly (more)
Courses and Classes for Teachers (more)
Mallets (more)
Product Spotlights (more)
Orff Instruments (more)
|

|
|


